How to Fix E-Bike Carbon Fiber Frame Clear Coat Chipping?
Your e-bike frame looks amazing until you spot it. A tiny chip in the clear coat. It feels like a small thing, but it can turn into a big problem fast.
Carbon fiber frames are strong, but their clear coat is not invincible. Rocks, buckles, and even rough handling can chip the surface. Once that happens, moisture sneaks in. That moisture can cause the paint to peel and separate from the frame.
The good news? You do not need to panic or rush to a shop. Most small chips can be fixed at home with simple tools. Clear nail polish works great for quick fixes. Automotive clear coat gives a tougher, longer lasting result.
In a Nutshell
- Act fast. Seal the chip right away. This stops moisture from sneaking in and causing paint to peel.
- Small chips are easy. Clear nail polish works great for minor damage. It dries fast and has a handy brush built in.
- Deeper chips need layers. Fill the chip, let it dry, then wet sand it smooth. Repeat this process until the area sits flush with the frame.
- Patience matters most. Always let each coat dry fully before adding another layer. Rushing this step ruins the finish.
- Want it to last longer? Automotive clear coat gives you a tougher, more durable repair than nail polish alone.
- Know your limits. If you see actual carbon fibers exposed, stop right there. This damage needs a professional to strip and refinish the area properly.
- Check your warranty first. Most manufacturers void coverage once you start repairing the frame yourself.
Why Clear Coat Chipping Happens on Carbon Fiber E-Bike Frames
Clear coat chipping happens to carbon fiber e-bike frames for several reasons. Understanding why helps you prevent future damage and fix current problems faster.
UV exposure breaks down clear coat over time. The sun’s rays damage the protective layer, making it brittle and prone to cracking. This is especially true if you park your e-bike outdoors regularly. Heat from direct sunlight accelerates this breakdown process significantly.
Impact and vibration cause chips and cracks. Your e-bike bounces on rough roads, hits curbs, and experiences constant vibration from the motor. These mechanical forces stress the clear coat until small pieces break away. Even minor bumps add up over months of riding.
Moisture gets trapped under the coating. When water seeps into tiny cracks, it sits between the clear coat and carbon fiber. This moisture causes the layers to separate, leading to larger chips and peeling. Temperature changes make this worse because materials expand and contract at different rates.
Poor clear coat application leaves weak spots. If the frame wasn’t properly prepared or the coating was applied incorrectly at the factory, weak areas develop. These spots chip more easily than well applied sections.
Chemical exposure damages the protective layer. Road salt, cleaning products, and harsh weather conditions eat away at clear coat. Salt is particularly destructive if you ride near coastal areas or during winter salt seasons.
Improper storage and handling matter too. Storing your e-bike in humid environments or dropping it during transport creates stress on the frame. These incidents can cause immediate chipping or weaken the clear coat for future damage.
The key takeaway? Seal chips immediately to prevent moisture from reaching the carbon fiber underneath. Quick action stops small problems from becoming expensive frame damage.
Assessing the Damage: Clear Coat Chip vs Exposed Carbon
Understanding the difference between a clear coat chip and exposed carbon fiber is essential before you start any repair work. This distinction determines whether you can fix it yourself or need professional help.
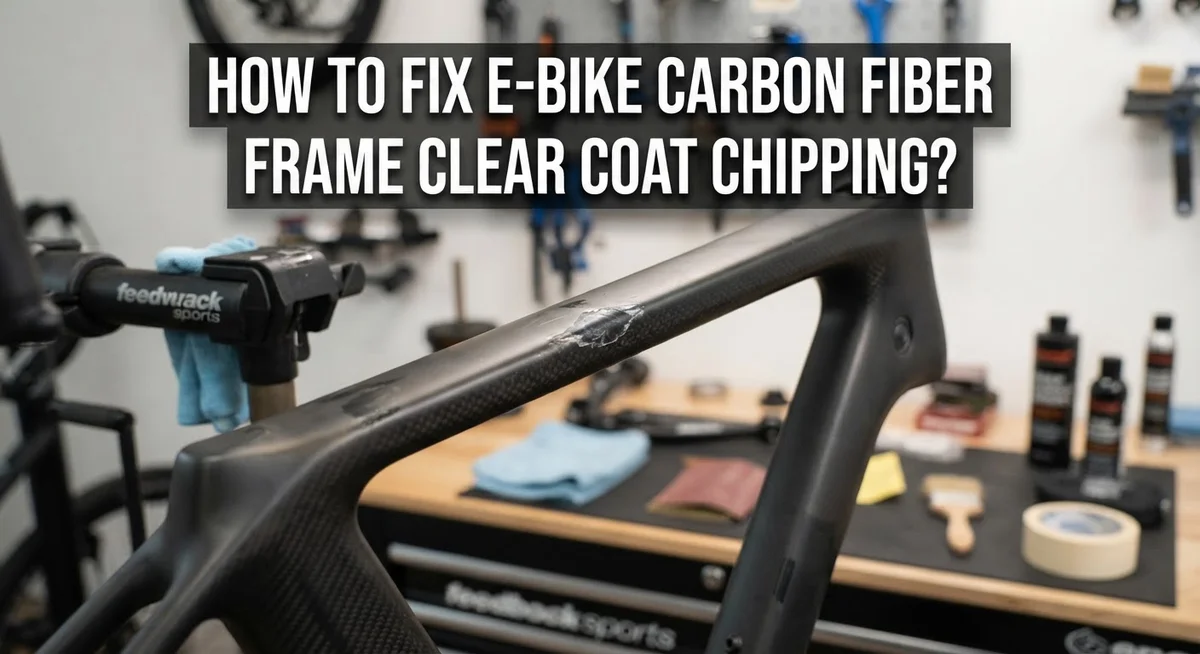
A clear coat chip appears as a small white or cloudy spot on your frame’s surface. The protective clear coating has cracked or flaked away, but the carbon fiber underneath remains intact and undamaged. You can see the carbon weave pattern clearly through the chip. This type of damage is safe to repair at home using simple methods.
Exposed carbon fiber looks completely different. You will see actual carbon strands or fibers that appear fuzzy, frayed, or abraded. The clear coat is gone, and the protective layer has been stripped away. This type of damage requires professional refinishing because the carbon needs proper sanding and resealing.
Here is how to tell the difference quickly. Shine a light on the damaged area. A clear coat chip shows a defined edge where the coating peeled away. Exposed carbon shows loose fibers that feel rough to your touch. Run your finger gently over it. Clear coat chips feel smooth at the edges. Exposed carbon feels textured and slightly raised.
If you see only the clear coat damage, proceed with confidence. You can handle this repair yourself using basic materials. If you discover actual carbon fiber exposure, stop immediately. Attempting to repair this yourself will likely make it worse. Professional shops have the equipment and expertise to properly strip, sand, and recoat your frame.
Taking five minutes to assess your damage correctly saves you time and frustration later.
Tools and Materials Needed for a DIY Clear Coat Repair
You’ll need just a few basic items to repair clear coat chips on your carbon fiber e-bike frame. Start with something to clean the damaged area. Use a soft cloth and mild soap or rubbing alcohol to remove dirt and oils. A clean surface helps repairs stick properly.
For the actual repair, you have two main options. Clear nail polish works well for small chips because it comes with a built-in brush and dries quickly. For deeper damage, automotive clear coat in spray or brush form gives you longer lasting results. Both options seal the chip and prevent moisture from getting underneath.
You’ll also need sandpaper for smoothing. Get some fine grit sandpaper (around 2000 grit or higher) for wet sanding between layers. This step keeps everything flush and smooth as you build up coats.
Grab a small bowl of water for wet sanding. You’ll dip your sandpaper in water to sand gently between applications. This prevents dust buildup and gives you better control.
A soft brush or applicator helps if you choose liquid clear coat instead of spray. Make sure it’s clean before each use. You might also want a lint free cloth for final cleanup and polishing.
Keep a dust free workspace ready. Cover nearby areas to catch any overspray if you use an aerosol can. Good ventilation matters too, so work outdoors or in a well ventilated space.
Finally, have patience ready. This isn’t a tool you buy, but it’s the most important item on your list. Let each coat dry completely before sanding or applying the next layer. Rushing ruins the repair.
Step-by-Step Guide to Fixing Clear Coat Chips
Start by gathering everything you need before touching your frame. You’ll want sandpaper in different grits (220, 400, and 600 work well), a small container of water, and either clear nail polish or automotive clear coat spray. Have a clean cloth nearby to wipe away dust and moisture.
Step 1: Clean the damaged area thoroughly. Use soap and water to wash around the chip. Dry it completely with a soft cloth. Any dirt or debris trapped in the chip will ruin your repair, so take your time here.
Step 2: Sand the chip gently. Use 220 grit sandpaper to lightly sand the edges of the chip. This helps the new clear coat stick better. Switch to 400 grit sandpaper and sand again for a smoother surface. Wipe away all dust with a damp cloth and let it dry completely.
Step 3: Apply your first coat. If using nail polish, brush it directly into the chip. If using spray clear coat, apply thin, even layers from 6 inches away. Let this coat dry fully according to product instructions before moving forward.
Step 4: Sand between coats. Once dry, use 600 grit sandpaper to lightly smooth the surface. This removes any bumps and helps the next layer bond properly. Wipe away dust again with a damp cloth.
Step 5: Apply additional coats as needed. Repeat steps 3 and 4 until the repair sits flush with the surrounding clear coat. This usually takes 2 to 3 coats. Never skip drying time between applications. Patience here prevents thick, uneven repairs that look obvious and fail quickly.
Tips for a Smooth, Durable, and Long-Lasting Repair
A smooth, durable repair starts with patience and proper technique. Let each coat dry completely before applying the next layer. Rushing this step causes bubbles and uneven surfaces that look worse than the original chip.
When you apply multiple coats too quickly, solvents trap air underneath. This creates a bumpy finish that catches light and shows every mistake. Wait the full drying time between applications, even if it feels slow.
Use wet sanding to keep surfaces smooth between coats. Wet sanding prevents dust from settling into your repair and creates better adhesion for the next layer. Keep your sandpaper wet and use light pressure. You want to smooth the surface, not remove material aggressively.
Shake spray cans properly before each use. Unshaken cans apply unevenly and create thin spots that fail quickly. Hold the can upright and shake for at least two minutes. Listen for the mixing ball moving inside. Dirty nozzles also cause problems, so test spray on a scrap surface first.
Work in a clean, dust free environment. Dust particles settle on wet clear coat and ruin the finish. Cover nearby items and avoid working outdoors on windy days.
Sand the chip edges gently before starting. Rough edges help the clear coat grip better and create a stronger bond. Use 220 grit sandpaper for this initial prep work.
Finally, apply thin coats rather than thick ones. Multiple thin layers build durability better than one heavy coat. Thick applications run, drip, and take forever to dry properly.
These simple practices transform your repair from temporary to lasting. Your e-bike frame will look professional and stay protected from moisture damage.
Common Mistakes to Avoid When Repairing Clear Coat Damage
When repairing clear coat chips on your carbon fiber e-bike frame, several common mistakes can ruin your hard work. Understanding what to avoid saves you time and frustration.
Skipping the drying time between coats ranks as the biggest error. Many people rush and apply the next layer before the previous one fully dries. This traps solvents underneath and creates bubbles or cloudiness in your repair. Each coat needs complete drying time, even if it seems dry to the touch.
Using unshaken spray cans causes uneven application and poor coverage. The propellant and clear coat separate during storage. Always shake your can thoroughly before spraying. Dirty or clogged nozzles also produce spotty results, so test spray on scrap material first.
Applying thick coats instead of thin ones leads to drips and runs. Multiple thin layers bond better than one thick coat. Patience with layering creates a professional finish.
Attempting repairs on exposed carbon fiber is another critical mistake. If the impact abraded away the carbon itself, you need professional stripping and resanding. DIY repairs only work for clear coat damage, not structural material damage.
Working in dusty environments invites particles into wet clear coat. Your repair surface attracts dust like a magnet when wet. Find a clean space away from air movement and dust sources.
Sanding too aggressively between coats removes your repair layers. Use light pressure with appropriate grit sandpaper. Gentle, circular motions work better than hard scrubbing.
Finally, don’t assume your repair is complete after one coat. Most chips need two to three layers to sit flush with surrounding clear coat. Rushing this process creates a visible depression or bump in your frame finish.
When to Stop DIY Repairs and Seek Professional Help
Knowing when to stop DIY work and call a professional saves your frame from permanent damage. You should seek professional help if the chip exposes carbon fibers underneath the clear coat. Exposed carbon requires full frame stripping and resanding before any new coating can stick properly. This work demands specialized equipment and expertise you likely don’t have at home.
Professional help becomes necessary when damage spreads beyond a small chip. If the clear coat is peeling, separating, or cracking across a large area, moisture has already penetrated deep into the layers. Attempting DIY fixes on widespread damage only traps moisture underneath and accelerates frame failure.
Stop DIY repairs if your frame has structural damage alongside the clear coat chip. Cracks in the carbon fiber itself, dents, or soft spots indicate internal damage. These problems require professional inspection and potential frame reinforcement or replacement.
Your warranty situation also matters here. Most manufacturers void warranties on frames you’ve repaired yourself. If your e-bike is still under warranty, contact the manufacturer first. They may cover the damage or provide official repair options.
Consider professional help if you’ve already attempted a DIY repair and it failed. Multiple failed attempts make the damaged area worse and harder to fix later. A professional can strip away failed repairs and start fresh with proper technique.
Time and skill limitations are valid reasons too. If you lack confidence in your sanding or coating abilities, professionals deliver better results. They complete repairs faster and more reliably than first time DIY attempts.
Professional repair shops have access to industrial grade clear coats and spray equipment. They work in controlled environments with proper ventilation and dust control. This produces finishes that outlast home repairs by years.
Preventing Future Clear Coat Chipping on Your E-Bike Frame
Your e-bike carbon fiber frame needs protection from future clear coat damage. Prevention is far easier than constant repairs. Start by identifying what causes chips in the first place. Impact damage, UV exposure, and moisture all contribute to clear coat failure.
Store your e-bike indoors whenever possible. Direct sunlight breaks down clear coat over time. Rain and humidity seep into microscopic cracks and cause delamination beneath the surface. A garage or shed protects your frame significantly better than outdoor parking.
Handle your e-bike with care during transport. Secure it properly in vehicles to prevent bumping against other objects. Use frame padding or protective bags when traveling. Even small impacts can create chips that spread later.
Inspect your frame regularly for early signs of damage. Small cracks in the clear coat grow quickly when exposed to moisture. Catching chips early means simpler repairs. Look closely at areas prone to contact like the bottom tube and chain stays.
Clean your frame gently using soft cloths and mild soap. Avoid harsh scrubbing or abrasive materials. Aggressive cleaning removes protective clear coat layers. Dry your frame completely after washing to prevent water spots and corrosion.
Apply a protective wax designed for painted surfaces. This adds an extra barrier against UV rays and minor scratches. Reapply wax every few months for continuous protection.
Avoid storing your e-bike near chemicals or extreme temperatures. These conditions weaken clear coat adhesion. Keep your bike away from direct heat sources and cold environments.
When you notice a chip forming, seal it immediately. Waiting allows moisture to penetrate deeper into the frame. Quick action prevents expensive professional repairs later. Your frame will last longer with consistent preventive care and attention.
Final Thoughts
Fixing chips on your e-bike carbon fiber frame does not need to feel overwhelming. Small chips respond well to simple fixes like clear nail polish or automotive clear coat. The key is acting fast before moisture sneaks in.
Remember that timing matters more than fancy tools. Sealing a chip within days stops it from spreading into a bigger problem. Waiting only makes repairs harder later.
Always let each layer dry fully before adding another. This single habit prevents most repair failures. Patience truly pays off here.
Keep your expectations realistic too. Clear coat repairs work great for surface damage. But exposed carbon fibers need professional attention, not a DIY fix.
Think of these repairs as temporary protection rather than permanent solutions. They buy you time and prevent further damage. Eventually, a full professional refinish might still be worth considering.
Your frame’s warranty status should guide your decision. If your bike is still covered, check with the manufacturer first. A DIY repair could void protections you already paid for.
Regular care makes the biggest difference long term. Inspect your frame often, clean it gently, and store it safely. These small habits reduce future chipping significantly.
Every e-bike owner faces wear and tear eventually. Chips happen from rocks, falls, or simple daily use. What matters most is how you respond.
With the right approach, you can protect your investment and keep your frame looking sharp. Quick action, careful application, and honest assessment of damage severity will serve you well.
Your carbon fiber frame deserves attention and care. Treat small chips seriously, and your e-bike will thank you with years of reliable, good looking performance.
Frequently Asked Questions
Can I use clear nail polish to fix a chipped clear coat?
Yes, clear nail polish works well for small chips. The brush applicator lets you apply polish directly into the damaged area. It dries quickly and costs very little. Let each coat dry completely before adding another layer. This method works best for chips that haven’t exposed the carbon fiber underneath.
What’s the difference between nail polish and automotive clear coat?
Clear nail polish offers a quick, budget friendly option for minor chips. Automotive clear coat provides better durability and UV protection for longer lasting repairs. Automotive products take longer to dry but create a stronger protective layer. Choose nail polish for temporary fixes and automotive clear coat for more permanent solutions.
Will fixing my frame’s clear coat void the warranty?
Most manufacturers void the warranty when you repair the frame yourself. Check your specific warranty terms before attempting any repairs. Professional repairs may also affect coverage depending on your warranty agreement. Contact the manufacturer if you’re unsure about your coverage before starting work.
When should I skip the DIY approach?
Skip DIY repairs if the carbon fibers are exposed or abraded. These situations require professional stripping and resanding of the entire frame. Also stop if your initial repair attempt failed or if damage spreads beyond a small chip. Structural damage alongside clear coat chipping also signals time to call a professional.
How do I prevent chips from happening again?
Store your e bike indoors and handle it carefully during transport. Inspect your frame regularly for early damage signs. Clean gently with soft cloths and mild soap. Apply protective wax designed for painted surfaces. Seal any new chips immediately to stop moisture from getting underneath.

Hi, I’m Lola Griffin 👩💻, the voice and creator behind ResizerBox. I’m a passionate tech enthusiast who loves exploring the latest gadgets, smart devices, and trending Amazon electronics. Through my reviews, I share honest insights, real-world testing experiences, and practical buying advice to help readers make confident tech choices.