How To Fix Underwater Scooter Propeller Shaft Bending?
Your underwater scooter suddenly feels off. It pulls to one side or makes a strange noise. Chances are, you have a bent propeller shaft.
This happens more often than you think. Hitting debris, wood, or rocks can bend the shaft in seconds. Even a small warp can throw off your whole ride.
The good news? You don’t always need a replacement. Many bent shafts can be fixed with the right steps and a bit of patience.
In a Nutshell
- Impact causes most shaft bends. Debris, wood, or hidden obstacles hit the propeller and bend the shaft underneath.
- Not every bend needs a full replacement. Minor warping can often be straightened with the right tools and patience.
- Removing the propeller comes first. You need clear access to the shaft before you check for damage or start repairs.
- Rotation testing reveals hidden problems. Spin the shaft by hand and watch for wobbling or uneven movement.
- Alignment matters more than looks. A shaft can look straight but still cause motor strain if it’s slightly off.
- Debris removal needs a gentle touch. Yanking tangled material with force often bends the shaft even more.
- Watch for gear oil leaks after repairs. This is a sign that your reassembly needs another look.
- Support the shaft properly during work. This prevents new bends while you’re fixing the old ones.
Understanding Propeller Shaft Bending and Its Causes
A bent propeller shaft happens when your underwater scooter hits something hard. Debris, rocks, or wood in the water can all cause this damage. The shaft is a metal rod that connects your motor to the propeller, so it takes a lot of stress during operation.
The severity of bending varies greatly. Sometimes you get minor warping that doesn’t stop the scooter from working. Other times, the shaft bends so badly that the entire unit fails.
Impact is the main culprit here. When your scooter collides with an obstacle, all that force goes straight to the shaft. The faster you are moving, the worse the damage tends to be.
You need to understand that shaft alignment is critical. Even a small bend throws off the balance of your entire propeller system. This misalignment causes vibration, reduces efficiency, and puts extra strain on your motor.
The damage can range from a barely noticeable curve to a severe kink. Minor warping might allow the scooter to still function, but performance drops noticeably. The propeller won’t spin smoothly, and you will feel unusual vibrations.
Detecting shaft damage early matters. Visual inspection helps, but rotation testing reveals problems you cannot see. When you manually spin the shaft, a bent one won’t rotate smoothly. You will feel resistance or wobbling.
The good news is that not every bend requires replacement. Minor warping sometimes responds to straightening attempts. Severe bends, however, need a full shaft replacement to restore proper function.
Understanding these causes helps you prevent future damage. Avoid shallow water with rocks or debris. Keep your speed reasonable in unfamiliar areas. These simple habits protect your shaft from unnecessary impact.
Signs Your Underwater Scooter Shaft Is Bent
A bent shaft shows up in several ways. Your scooter might feel sluggish or unresponsive when you accelerate. The motor may make strange grinding or vibrating sounds that weren’t there before.
You might notice the propeller doesn’t spin smoothly anymore. When you move the scooter by hand, the propeller catches or resists at certain angles. This is a clear sign something is wrong with the shaft alignment.
Visible wobbling is another indicator. If you look at the propeller while rotating it slowly, watch for side to side movement. A straight shaft stays centered. A bent one moves in circles or waves.
Check for vibration in the handle or control area. A damaged shaft transfers vibrations throughout the entire scooter. You will feel this when you grip the handles during operation.
Listen for unusual noises. A bent shaft creates clicking, grinding, or scraping sounds as the propeller rotates. These noises get worse as the bend becomes more severe.
Performance drops noticeably. Your scooter won’t reach normal speeds. It might pull to one side instead of moving straight. The motor works harder and drains your battery faster.
Look for gear oil leaks around the shaft area. A bent shaft can damage seals and gaskets. Oil leaking is a sign internal damage has occurred.
Manual rotation testing works well. Turn off the scooter and try spinning the propeller by hand. Resistance or catching indicates a problem. A healthy shaft spins freely with minimal effort.
Check the propeller itself for damage. Sometimes the propeller gets damaged along with the shaft. Bent blades or missing chunks point to impact damage.
Don’t ignore early warning signs. Small bends get worse quickly during operation. Catching problems early saves you money and keeps your scooter safe to use.
Tools and Preparation Before You Start
Before you start fixing your underwater scooter’s propeller shaft, gather the right tools and prepare your workspace properly. This step saves time and prevents further damage to your equipment.
You’ll need basic hand tools for this job. A wrench set helps you loosen the coupler that connects the shaft to the motor. Screwdrivers (both flathead and Phillips) remove fasteners holding the propeller assembly together. Keep adjustable wrenches handy for different bolt sizes.
Precision tools matter for alignment checks. A straightedge or alignment tool lets you see exactly how bent the shaft is. Some people use a simple ruler held against the shaft to spot warping. A flashlight helps you inspect tight spaces where the shaft connects to other parts.
Soft tools prevent additional harm. Use scissors or small wire cutters to remove tangled debris gently. Never use hammers or heavy tools that could worsen the bend. Soft brushes clean away sand and salt buildup without scratching metal surfaces.
Prepare your work area carefully. Find a clean, dry spot with good lighting. Lay down a cloth or towel to catch small parts you remove. Have a container ready for bolts and fasteners so nothing gets lost. Keep paper towels nearby for wiping away grease and seawater residue.
Gather safety equipment too. Wear gloves to protect your hands from sharp metal edges and salt corrosion. Safety glasses shield your eyes when removing components. Have a rag available for wiping your hands between steps.
Support materials are essential. You’ll need blocks or stands to hold the shaft stable while you work. Never let the shaft hang freely during repairs. Proper support prevents accidental bending from the weight of tools or your hands.
Double check that you have everything before starting. Missing tools force you to stop midway through the repair, risking damage to exposed parts. A complete setup means you finish the job right the first time.
Step-by-Step Guide to Diagnosing and Fixing a Bent Shaft
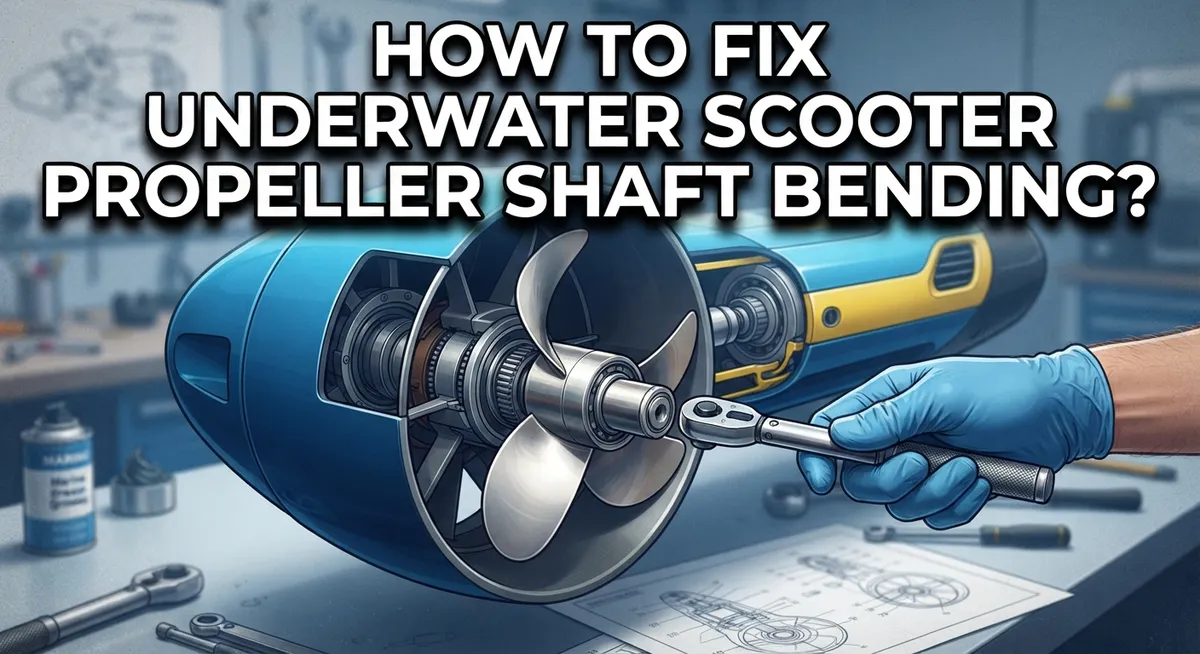
The first step is to remove the propeller carefully. Turn off and disconnect your scooter completely. Locate the propeller nut or fastener and loosen it slowly. Some models use a clip or pin instead. Set these small parts in a safe container so you don’t lose them.
Next, loosen the coupler that connects the shaft to the motor. This coupling usually has bolts around it. Turn each bolt a quarter turn at a time in a circular pattern. This prevents uneven pressure that could damage the coupler itself.
Now support the shaft properly. Place wooden blocks or stands under the shaft at multiple points. The shaft must stay level and stable during your inspection. Never let it hang freely, as this creates stress on the motor connection.
Rotate the shaft slowly by hand to feel for resistance or grinding. A bent shaft won’t spin smoothly. You’ll notice flat spots or hesitation points as you turn it. Mark these problem areas with tape or a marker so you can see them clearly.
Check the shaft alignment using a straightedge or alignment tool. Place it along the shaft’s length. Any gap between the tool and shaft shows bending. Measure the gap to understand how severe the bend is.
Inspect the shaft surface for cracks, dents, or kinks. Minor surface scratches are normal. Deep gouges or visible bends mean replacement is necessary. Small warping sometimes allows for straightening, but severe damage requires a new shaft.
Look for gear oil leaks around where the shaft enters the motor housing. Leaks indicate internal damage or seal problems. This information helps you decide if repair or replacement makes sense.
Take photos of your findings before you proceed. This documentation helps you remember exactly what you discovered and makes reassembly easier.
Tips for Safely Straightening a Warped Shaft
Minor shaft warping can sometimes be fixed without full replacement. The key is working carefully and avoiding further damage during the process.
Start by securing the shaft firmly in a stable support system. Use blocks or padded stands to hold it steady. Never clamp the shaft directly in a vise, as this can create new dents or stress points. The shaft needs to stay immobile while you work.
Assess the bend severity before attempting any straightening. A slight curve might respond to gentle pressure. A severe kink usually requires replacement instead. Rotate the shaft slowly and observe where the bend occurs. Mark the problem area with tape or a marker so you can focus your efforts.
If straightening is possible, apply pressure gradually and evenly. Work from the center of the bend outward. Use a rubber mallet or wooden block to distribute force across a wider area. Strike gently and check alignment frequently. Aggressive hammering often creates new problems rather than solving existing ones.
Check your progress regularly with a straightedge or alignment tool. Place it against the shaft and look for gaps. Small gaps indicate remaining warping. Continue working until the shaft sits flush against the straightedge.
After straightening, inspect the shaft surface closely. Look for cracks or stress marks that might have appeared during work. These indicate structural weakness that means replacement is necessary.
Test the shaft rotation by hand before reassembly. It should spin smoothly without catching or grinding sounds. Listen carefully for any resistance.
Let the shaft rest for a few hours after straightening work. Metal sometimes shifts slightly after being worked. Check alignment again before reassembling the propeller and coupler.
Monitor the scooter closely after use. Watch for vibration, noise, or performance changes that suggest the repair didn’t hold properly.
Common Mistakes to Avoid During Repair
When repairing your underwater scooter’s propeller shaft, certain mistakes can make the problem worse. Avoid aggressive debris removal at all costs. If seaweed, rope, or branches wrap around the shaft, use small scissors or gentle tools to cut them away. Yanking hard or pulling forcefully can bend the shaft further or scratch the surface, creating weak points that lead to cracking.
Improper reassembly causes serious alignment issues. After you straighten or replace the shaft, putting parts back together carelessly ruins all your work. The coupler must connect perfectly to the motor. The propeller must sit straight on the shaft. Even small misalignments create vibration, drag, and motor strain that damages your scooter faster.
Many people skip alignment checks entirely. This is a critical error. After reassembly, always use a straightedge or alignment tool to verify the shaft runs true. Rotate it by hand and feel for wobbling or grinding sounds. These signs mean something is wrong before you take your scooter into the water.
Don’t ignore gear oil leaks after repair work. If you see oil seeping from the motor housing, the shaft seal may be damaged. This allows water inside the motor, which causes rust and electrical problems. Stop using the scooter immediately and inspect the seal.
Another common mistake is working too fast. Rushing through repairs leads to missed damage, forgotten steps, and poor results. Take your time. Inspect each part carefully. Document what you find with photos. This helps you understand what went wrong and prevents future bending.
Finally, avoid reusing obviously damaged components. If the shaft has visible cracks, deep dents, or permanent bends, straightening won’t work reliably. Replace it instead. A new shaft costs less than repairing water damage from a failed repair.
Post-Repair Testing and Troubleshooting
After you repair or straighten your underwater scooter’s propeller shaft, testing is essential. You need to verify that everything works correctly before taking your scooter back into the water.
Start with a dry run first. Reassemble all components carefully and rotate the shaft by hand. It should spin smoothly without resistance, grinding sounds, or wobbling. If you feel any grinding or hear unusual noises, stop immediately. This means something is still misaligned or damaged.
Check the alignment one more time using a straightedge tool. Place it against the shaft and look for gaps. The shaft should sit flush against the straightedge along its entire length. Any visible gaps indicate misalignment that needs correction before water use.
Inspect the coupler connection closely. Make sure it’s tight and secure. A loose coupler will cause vibration and further damage. Spin the shaft again to confirm the coupler stays firm and doesn’t slip.
Look for gear oil leaks around the motor housing where the shaft enters. Leaks mean seals are damaged and need replacement. Don’t ignore this issue because water will enter the motor and cause failure.
Run the motor briefly in a controlled setting if possible. Listen for unusual sounds. The motor should hum smoothly without grinding or rattling. Vibration during operation suggests alignment problems still exist.
Before water testing, let everything settle for several hours. This allows any straightening work to stabilize. Then perform another manual rotation test. The shaft should still spin freely and smoothly.
Start with shallow water testing. Run the scooter for just a few minutes. Monitor for vibration, unusual sounds, or performance changes. If everything feels normal, gradually increase usage. Keep watching for any signs of problems developing over the next few uses. Consistent monitoring helps catch issues early before major damage occurs.
Final Thoughts
Fixing a bent propeller shaft is a manageable task. You don’t need advanced skills to do it right. Patience and careful attention matter more than fancy tools.
Start small and stay calm during every step. Rushing causes most repair failures. Take your time with each part of the process.
Remember that not every bent shaft needs replacement. Minor warping often responds well to careful straightening. Save your money when you can fix things safely instead.
However, some damage is too severe to repair. Deep bends or cracked metal mean replacement is your only safe option. Trying to force a badly damaged shaft back into shape can break it completely.
Always check alignment before and after your repair work. This single step prevents most future problems. A shaft that looks straight can still be misaligned.
Testing matters just as much as the repair itself. Run your scooter in controlled settings first. Watch closely for unusual vibrations or noises.
Gear oil leaks are your early warning system. Check for them regularly after any repair. Catching leaks early saves you from bigger motor problems later.
Your underwater scooter depends on a properly working shaft. This part connects your motor to the propeller directly. Any misalignment affects your entire diving experience.
Keep spare parts on hand if possible. This helps you act fast when problems appear. Quick action often prevents small issues from becoming major repairs.
Regular inspections help you catch bending early. Check your shaft after any impact with rocks or debris. Early detection makes repairs easier and cheaper.
With the right approach, most shaft problems are fixable. Stay methodical and follow proper steps. Your scooter will reward you with reliable performance underwater for years to come.
Frequently Asked Questions
Can a bent propeller shaft be fixed or does it need replacement?
The answer depends on how severe the bend is. Minor warping can often be straightened with careful work. You remove the propeller, loosen the coupler, and gently apply pressure to realign the shaft. However, if the shaft has deep cracks, severe kinks, or multiple bends, replacement becomes necessary. Visual inspection and rotation testing help you determine the damage level before deciding which path to take.
How do I know if my shaft is actually bent?
Start with a visual inspection under good lighting. Rotate the shaft slowly by hand and watch for wobbling or irregular movement. A bent shaft won’t spin smoothly. You can also use a straightedge tool placed along the shaft’s length to spot misalignment. If the shaft touches the straightedge unevenly, bending has occurred. Listen for grinding sounds during rotation, which also signal damage.
What causes underwater scooter propeller shafts to bend in the first place?
Impact is the primary culprit. Debris like rocks or wood strikes the propeller during use. Tangled seaweed or fishing line can wrap around the shaft and create stress. Hitting the seafloor or underwater structures causes immediate bending. Even minor collisions accumulate damage over time. Proper alignment prevents some stress, but impacts remain the biggest threat to shaft integrity.
Should I attempt straightening or go straight to replacement?
Try straightening first if the bend is minor and you have the right tools. Support the shaft properly during work to avoid creating new damage. However, if you lack experience or the bend looks severe, replacement is safer. A poorly straightened shaft causes motor problems and alignment issues later. When in doubt, consult repair guides or seek professional help before proceeding.

Hi, I’m Lola Griffin 👩💻, the voice and creator behind ResizerBox. I’m a passionate tech enthusiast who loves exploring the latest gadgets, smart devices, and trending Amazon electronics. Through my reviews, I share honest insights, real-world testing experiences, and practical buying advice to help readers make confident tech choices.