How To Fix Smart Lock Keypad Rubber Coating Peeling?
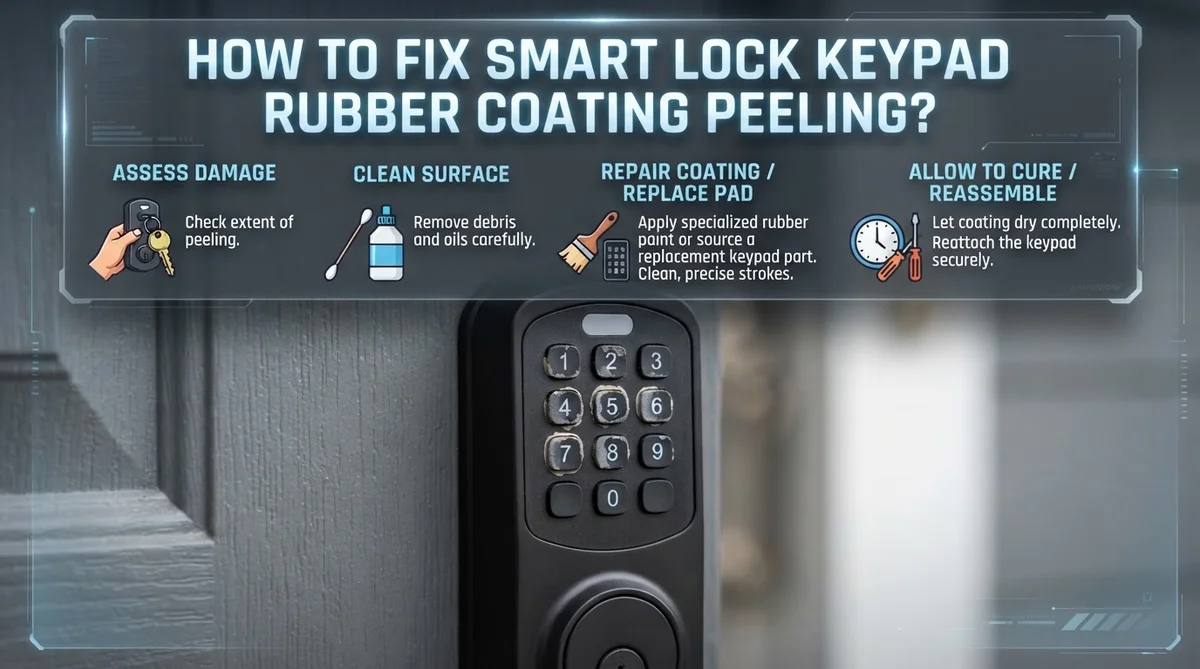
Your smart lock keypad looks worn and sticky. The rubber coating peels off in small strips. It feels annoying every time you punch in your code.
This problem happens to many smart locks over time. Heat, moisture, and daily use break down the rubber coating. The result is a messy, unattractive keypad that still needs to work perfectly.
Good news: you can fix this issue at home. You do not need to buy a new lock right away. With a few simple steps, you can restore your keypad or stop the peeling from getting worse.
This guide walks you through the entire process. You will learn how to assess the damage first. Then we cover cleaning methods using isopropyl alcohol. We also explain how a thin oil layer can protect the coating.
In a Nutshell
- Check the peeling first. See if the rubber coating comes off cleanly or if it sticks stubbornly to the keypad surface.
- Clean with isopropyl alcohol. Wipe the keypad several times to remove sticky residue and leftover coating bits.
- Apply a thin oil layer. This step restores the coating’s feel and helps it last longer.
- Try spray adhesive for loose film. If the coating peels cleanly, glue it back down instead of removing it completely.
- Avoid common mistakes. Don’t peel aggressively, don’t overuse oil, and don’t ignore small peeling spots.
- Know when to replace. If peeling is severe or the keypad buttons stop working properly, replacement becomes the smarter choice.
Why Smart Lock Keypad Coating Peels Over Time
Smart lock keypads face a tough environment. They sit outside, exposed to sun, rain, and temperature swings. These conditions break down rubber coatings over time.
The rubber coating on your keypad serves an important purpose. It protects the buttons underneath and makes them comfortable to press. It also keeps moisture and dirt away from the electronics.
UV rays from sunlight damage the coating the most. The sun’s energy breaks chemical bonds in the rubber material. This causes the coating to crack, fade, and eventually peel away in layers.
Moisture plays a huge role too. Rain, humidity, and condensation seep into tiny cracks in the coating. Water gets trapped under the rubber film and loosens the bond between the coating and the keypad surface. This is why peeling often starts at the edges first.
Temperature changes stress the coating constantly. When it gets hot, the rubber expands. When it cools down, it contracts. This back and forth movement weakens the adhesive that holds the coating in place.
Frequent finger contact accelerates wear as well. Oils from your skin, sweat, and dirt build up on the surface. Over time, this sticky layer breaks down the coating’s integrity from the outside.
Salt air in coastal areas speeds up peeling significantly. Salt crystals corrode the coating and the adhesive underneath.
The good news is that peeling happens gradually. You catch it early if you pay attention. Small peeling spots at the corners or edges give you time to act before the entire coating fails. Addressing the problem in early stages prevents further damage to the keypad electronics underneath.
Assessing the Severity of the Peeling Before You Start
Before you start fixing your smart lock keypad, take time to understand how bad the peeling really is. This step matters because it determines your repair approach and whether you should replace the lock entirely.
Look closely at the rubber coating on your keypad. Check if the peeling covers just one or two buttons, or if it spreads across the entire surface. Small peeling spots are easy to fix. Widespread damage might need more effort or replacement.
Test how the coating comes off. Gently try to lift a peeled edge with your fingernail. Does it peel away cleanly from the keypad base? Or does it stick stubbornly and tear into pieces? Clean removal means you can reattach it with adhesive or clean it properly. Stubborn coating requires complete removal and cleaning.
Examine the keypad underneath the peeling. Look for cracks, discoloration, or damage to the actual button surface. If the underlying keypad looks fine, repair is worth your time. If you see deep cracks or the buttons don’t respond properly, replacement makes more sense.
Feel the sticky residue left behind. Is it thick and gummy or just a light film? Heavy residue takes more cleaning effort. Light residue cleans quickly.
Consider where the peeling started. Does it begin at the edges where water might seep in? Or does it spread from the center where fingers contact the buttons most? Edge peeling suggests moisture damage. Center peeling usually means normal wear.
Finally, check if all buttons peel equally or just specific ones. Uneven peeling tells you about your usage patterns and helps you prevent future damage after repair.
Step-by-Step Guide to Cleaning and Repairing the Keypad
Start by gathering the right supplies before you begin. You will need isopropyl alcohol, clean cloths or paper towels, and a small container to hold the liquid.
Prepare your workspace first. Find a well lit area where you can see the keypad clearly. Make sure the smart lock is powered off or disconnected if possible. This keeps you safe while working. Lay down a cloth to catch any drips or residue.
Pour isopropyl alcohol into your container. You only need a small amount. Dip a clean cloth into the alcohol and wring it out so it is damp, not dripping wet. Excess liquid can damage the lock’s internal parts.
Gently wipe the keypad surface. Use slow, circular motions to clean each button. Pay special attention to areas where the coating is peeling. The alcohol dissolves sticky buildup and leftover adhesive. Repeat this process three to four times with fresh cloths each time.
Let the keypad dry completely. Wait at least 15 to 20 minutes before touching it again. Moisture can interfere with the next steps. You can speed up drying by using a soft cloth to pat the surface gently.
Check your progress. Once dry, inspect the keypad carefully. The peeling should be less noticeable, and the surface should feel cleaner. If sticky residue remains, repeat the alcohol cleaning one more time.
Avoid rushing this process. Taking your time prevents damage to the keypad buttons underneath. Aggressive scrubbing can scratch the surface or push water into crevices where it causes problems later.
Reattaching Peeling Film With Spray Adhesive
Spray adhesive offers a practical solution when your smart lock keypad’s rubber coating peels cleanly away from the underlying surface. This method works best if the film separates without tearing and the keypad underneath remains undamaged.
Start by ensuring the keypad is completely dry. Any moisture prevents adhesive from bonding properly. Wipe the area one more time with a clean, dry cloth and wait several minutes.
Next, carefully lift the peeling section just enough to access the back side. Don’t force it or you risk tearing the coating. Gently fold it back like you’re opening a book.
Apply spray adhesive to the underside of the peeling rubber coating. Use light, even passes rather than heavy sprays. Heavy application causes overflow and messy residue on surrounding areas.
Press the coated section firmly back onto the keypad. Start from one edge and work toward the opposite end. This removes air bubbles and ensures full contact. Use your finger to apply steady pressure across the entire surface.
Let the adhesive cure for the recommended time before touching the keypad. Most adhesives need 24 hours for full strength. Avoid using your smart lock during this period.
Once cured, test the repaired area gently. The coating should feel secure and not lift when you press the buttons. If any edges still feel loose, apply a small amount of adhesive underneath and press again.
This reattachment method preserves your original keypad appearance without replacing the entire coating. It’s cost effective and takes minimal time. The repair holds well if you follow the adhesive instructions carefully and avoid rushing the curing process.
Cosmetic Restoration: Repainting and Redrawing Digits
When your keypad’s rubber coating peels, you have a practical option: repaint and redraw the digits yourself. This approach works well when the underlying keypad remains functional but looks worn or faded.
Start by cleaning the entire keypad surface with isopropyl alcohol. Wipe it multiple times to remove all residue and oils. Let it dry completely for at least 20 minutes. A clean surface ensures your paint adheres properly and lasts longer.
Next, apply a thin oil layer to the keypad. This step restores the coating’s appearance and protects the underlying material. Use minimal oil to avoid a slippery feel. Wipe away any excess with a clean cloth.
For the actual repainting, consider spray paint designed for rubber or plastic surfaces. Apply thin, even coats rather than one thick coat. Multiple light coats prevent dripping and create a smoother finish. Allow proper drying time between each coat according to the product instructions.
Once the base coat dries, you can redraw the digits. Use a permanent marker or paint pen with fine tips. Work slowly and carefully to match the original digit layout. Steady your hand by resting it on the keypad’s edge.
Test your work before considering it complete. Press each button several times to ensure the paint doesn’t crack or flake. The digits should remain visible and readable after repeated use.
This cosmetic restoration keeps your smart lock looking fresh without replacing the entire keypad. The process takes just a few hours and costs very little. Your lock maintains its original functionality while gaining a refreshed appearance.
Ongoing Maintenance to Prevent Future Peeling
Regular maintenance stops rubber coating problems before they start. You should clean your keypad monthly with isopropyl alcohol to prevent sticky buildup that accelerates peeling.
Wipe the entire surface gently using a soft cloth. This removes dust, oils, and debris that weaken the rubber coating over time. Pay special attention to the spaces between buttons where dirt collects easily.
After cleaning, apply a thin oil layer to the keypad surface. This step keeps the rubber flexible and prevents cracking. Use minimal oil—too much causes slipperiness and attracts more dirt. A light coating every two to three months maintains the coating’s integrity.
Avoid exposing your smart lock to extreme conditions when possible. Direct sunlight, heavy rain, and temperature swings damage rubber coatings faster. If your lock faces harsh weather, consider installing a protective cover or awning above it.
Check your keypad regularly for early peeling signs. Catching problems early means simple cleaning fixes them instead of requiring full restoration. Inspect the edges and corners where peeling typically begins first.
Never use harsh chemicals or abrasive scrubbers on the keypad. These damage the rubber coating and create entry points for moisture. Stick to isopropyl alcohol and soft cloths for all cleaning tasks.
Keep your hands clean before using the keypad. Dirt and sweat accelerate coating breakdown. Wash your hands regularly, especially before entering security codes.
Store any protective covers properly if you use them. Covers should allow air circulation to prevent moisture buildup underneath. Check under covers monthly to ensure no moisture has accumulated.
These simple habits extend your keypad’s lifespan significantly. Consistent maintenance prevents expensive repairs and keeps your smart lock functioning smoothly for years.
Common Mistakes That Make Peeling Worse
Many people accidentally make peeling worse by rushing the repair process. Aggressive peeling is the biggest mistake. When you see rubber coating lifting, don’t yank it off forcefully. Forcing the material away from the keypad damages the underlying buttons and electronics.
Stop and assess first. Check if the coating peels cleanly or if adhesive still holds it firmly. Yanking on stuck sections tears both the rubber and the keypad surface beneath it.
Over applying oil creates another common problem. People think more oil restores the coating better, but thick oil layers attract dirt and dust. This buildup makes the keypad sticky and uncomfortable to use. Use thin layers only. One light coat is enough. Wipe away excess with a clean cloth.
Ignoring early peeling stages costs you time later. Small peeling spots grow into larger problems when exposed to moisture and air. Address peeling as soon as you notice it starting.
Using harsh chemicals damages the rubber coating permanently. Bleach, acetone, or strong degreasers dissolve rubber materials. These chemicals cause faster deterioration and create new peeling areas. Stick with isopropyl alcohol for cleaning, which is gentle and effective.
Skipping the drying step leads to failed repairs. If you reattach peeling coating while moisture remains underneath, the adhesive won’t bond properly. Always ensure the keypad is completely dry before attempting any fix.
Exposing your lock to extreme heat or cold accelerates coating breakdown. Leaving your smart lock in direct sunlight or freezing temperatures weakens the rubber. Protect your lock from harsh weather when possible. These preventive steps keep your keypad functioning smoothly for years.
Signs You Need Professional Repair or Replacement
Your smart lock keypad tells you when professional help becomes necessary. Pay attention to these warning signs before the problem escalates beyond simple fixes.
Extensive peeling that covers more than half the keypad surface requires professional evaluation. When coating strips away in large sections, the underlying mechanisms may suffer damage. Small repairs work well for minor issues, but widespread deterioration needs expert assessment.
Check if the keypad still responds accurately to your touches. If buttons stick, register slowly, or fail to respond consistently, the damage has likely reached the electronic layer beneath. This indicates internal malfunction that DIY methods cannot address.
Look for visible damage to the keypad buttons themselves. Cracks, dents, or warping suggest the coating peeling exposed the keypad to moisture or impact. Structural damage means replacement becomes your best option rather than repair.
Test whether water or debris has entered the lock mechanism. If your smart lock malfunctions during or after the peeling occurred, internal components may need attention. Professional technicians can diagnose hidden water damage that cleaning and oil application cannot fix.
Consider replacement if the keypad numbers have completely worn away. When you cannot identify which button is which, safety becomes an issue. You need clear, readable buttons to operate your lock reliably.
Pay attention to how your lock was manufactured. Some keypads use sealed components that professionals must replace as complete units. Attempting DIY repair on these models can void warranties or cause permanent damage.
Trust your instincts. If the peeling seems severe, the repair feels complex, or you lack confidence in your abilities, contact a professional. Getting expert help early prevents costlier problems down the road and ensures your smart lock functions securely.
Final Thoughts
Fixing a peeling smart lock keypad does not need to be complicated. Simple tools like isopropyl alcohol and a thin layer of oil solve most problems.
Your keypad’s condition tells its own story. Minor peeling responds well to cleaning and reattachment methods. Severe damage often points toward replacement instead.
Take time to assess your situation before jumping into repairs. Check how much coating has actually peeled away. This helps you choose the right approach from the start.
Cleaning remains your first line of defense against peeling issues. Wipe the keypad surface with alcohol whenever you notice buildup. This small habit prevents many bigger problems down the road.
Remember that rushing repairs usually backfires. Take each step slowly and let surfaces dry completely. Patience during the process leads to better results overall.
Spray adhesive works well for reattaching film that peels cleanly. This method keeps your original keypad design intact. It also saves you money compared to full replacement.
Cosmetic touch ups like spray paint give your lock a fresh look. This option works best when the underlying keypad still functions properly. Focus on function first, then appearance second.
Not every peeling keypad needs professional attention. Many homeowners fix minor issues themselves within minutes. Save the professional route for extensive damage or mechanism problems.
Your smart lock protects your home every single day. Keeping its keypad in good shape matters for both looks and security. Regular care now means fewer headaches later.
Trust these simple steps to handle most peeling situations you encounter. With the right approach, your keypad can look and function like new again.
Frequently Asked Questions
Why does my smart lock keypad rubber coating peel in the first place?
The rubber coating on keypads wears down from regular finger contact, exposure to moisture, and temperature changes. Over time, the adhesive holding the coating weakens. UV rays and harsh weather accelerate this process. The coating eventually separates from the keypad surface, creating that peeling film you see.
Can I fix peeling rubber coating myself?
Yes, most peeling issues you can handle at home. Start by cleaning the keypad with isopropyl alcohol and wiping multiple times. This removes sticky residue and loosens the coating. Next, apply a thin oil layer to restore the coating’s flexibility. For cosmetic improvements, you can use spray paint to redraw worn digits.
What if the peeling coating comes off completely?
If the coating removes cleanly, you have two options. You can apply spray adhesive to reattach the film carefully. Alternatively, leave the keypad exposed and focus on keeping it clean and dry. Either way, the underlying buttons still function normally. Just avoid forcing removal if the adhesive feels strong, as this damages the keypad.
How do I prevent peeling from happening again?
Regular maintenance stops future peeling. Clean your keypad with isopropyl alcohol every few weeks to prevent sticky buildup. Apply thin oil layers to keep the coating flexible. Avoid exposing your lock to extreme heat or cold whenever possible. Store protective covers properly if you use them.
When should I replace my keypad instead of repairing it?
Replace the keypad if peeling covers more than half the surface or if buttons no longer respond to your touches. Check for cracks, dents, or water damage inside the lock mechanism. If numbers have completely worn away and cleaning doesn’t help, replacement makes sense. Trust your instincts about when repair stops being practical.

Hi, I’m Lola Griffin 👩💻, the voice and creator behind ResizerBox. I’m a passionate tech enthusiast who loves exploring the latest gadgets, smart devices, and trending Amazon electronics. Through my reviews, I share honest insights, real-world testing experiences, and practical buying advice to help readers make confident tech choices.